This blog is just my little space for sharing lessons I've developed for my classroom and ideas that inspire my teaching.
Tuesday, August 2, 2011
Photosynthesis Model
After learning the photosynthesis song, http://www.youtube.com/watch?v=C1_uez5WX1o, we create a photosynthesis model. This model begins as a single sheet of copy paper. Fold it in half and cut out a large leaf shape. Very little scrap should be left over, but don’t toss it away! The two leaves are glued together from the petiole towards the tip. We draw in veins and label the upper epidermis. Fold the upper leaf back, so it stands up and away from the lower leaf. Draw the veins on the lower leaf. I show the students how to draw a cross-section that indicates the epidermis layer. Using some of the scraps, we cut and color a scalloped strip to represent the chloroplasts. This gets glued to the upper leaf, along the inside, right at the fold. Finally, students cut out 4 arrows, free-hand or stenciled, label each with the basic steps of photosynthesis, and glue them to the leaf.
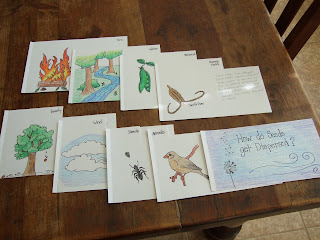
How Do Seeds Get Dispersed?
First, I should give a “heads-up.” This is not a one-class period lesson. There is going to be a lot of drawing, discussion, and writing. Plan on at least 2-3 class periods for students to complete this mini-book.
Here, students will create a book where each page presents a different way in which seeds get moved from one location to another. Yes, my class uses the term “dispersal.” It is an advanced word for them, but in my experience, they assess more importance to academic language than the common words they use. So using the term ‘dispersal’ instead of saying ‘moved around’ creates for them a greater sense of importance to the process.
You will need 5 sheets of paper to build this book. Cut the papers in half width-wise. Along the top edge of the half sheets, measure in 1 inch x 1 inch and remove (cut) that square inch off. On the next page, remove a 2 inch x 1 inch section. On the third page remove a 3 inch x 1 inch section. Continue increasing the size of the section this way until your cover page, where you will remove the entire top down 1 inch. (Refer to the photos to see how this looks when done.) Assemble book by punching three holes along the left-hand side and using brads. Create a cover page with the title “How do Seeds get Dispersed?” Label each tab with a type of seed dispersal. On the page of each tab, draw an example and explain how that form of dispersal works. My class often gets into deep discussion about each method, and in the case of the barbs, hooks, and burrs, I bring in examples for the students to examine.
Once ready, students can use the booklet to study and self-test.
Cross-Pollination & Self-Pollination
This is another super simple foldable, called a shutter fold. It begins with a regular sheet of copy paper. Each ‘short’ side is folded in towards the center of the paper. On the front, each flap contains an example of one type of pollination and is labeled. Be sure your students understand that one flowering plant is growing from a single root system while the other shows two flowers with separate root systems.
Inside, there is plenty of room for explaining each type of pollination and comparing/contrasting their similarities and differences. We usually cover the pros and cons of each type of pollination too.
Types of Roots: A Science Foldable
This foldable is so simple! Fold a regular sheet of copy paper in half hamburger (width-wise) style. Cut the front in half up to the fold line. On one side, draw a fibrous root and on the other a tap root. As a class, we discuss the physical differences while we are drawing them.
Once we are ready to write our information inside, we brainstorm reasons for the differences, benefits and drawbacks of the differences, and examples we’ve come across. I make sure that the students know that fibrous roots are great for erosion control, are able to get shallower water sources, and firmly hold a plant (think of all those weeds you’ve tried to pull!). Meanwhile, a taproot makes it difficult to destroy a plant because even the smallest root bit left behind will begin to regrow. We also look at young seedlings and how many start with a taproot but will develop fibrous roots as it matures.
Limb, Branch, And Twig; A Science Foldable
The queen of foldables, Dinah Zike, suggested this foldable in her Big Book of Science. I hand drew the image based on her example. Just like the flower parts foldable, the cut marks were made at 2 ¾ inches. Each section contains part of the tree and is labeled to identify it. Here, unlike the Parts of a Tree Poster, we are able to clearly see the difference between a limb, branch, and twig.
Under each flap, is a description of the part’s job. We do this part as a class to ensure all students have complete and correct information. Then, like with other foldables, students are able to study and self-test themselves.
Parts Of A Tree; A Science Poster
I am always amazed what I learned but was never officially taught. Then, my students come to me, and I sometimes expect them to have the same background information. I am constantly reminding myself that I cannot make such assumptions. The parts of a tree exemplify this. While many students know what a trunk is, they may not know the difference between a limb and a branch or that the top of a tree is called a “crown.”
This is a poster drawn on a regular sheet of copy paper. I have the students freehand a tree while I walk them through it by drawing on the board. Believe it or not, I start with the foliage. Basically, they are cloud-like shapes, but I only do these on one side of the paper. Then, we draw the trunk and roots. At this point, the hardest part begins—limbs, branches, and twigs. I remind my students that most of these will reach upwards (and we discuss why—to help the leaves get as much sunlight as possible). They also become narrower the further they are from the trunk. You will also notice that my model displays one of my favorite art lessons—nothing in nature is a single color! I don’t let my students get away with solid, green foliage. (We don’t have art in our school, but I am an artist; I try to get art lessons in whenever I can!) We talk about where the sunlight is going to hit the leaves the most and color that area a lighter green than where there will be shadows, which will be the darkest green.
This is a quick lesson to ensure that we all have the same background knowledge and can use the same vocabulary.
Flower Parts And Their Jobs: A Science Poster
First, I need to admit that I traced this image. I didn’t like any of my free-handed, dissected flowers, and just like I tell my students not to get hung up on their drawings, I had to allow that the stress of drawing this image well enough was getting too great. (I’ll also admit that I am rather proud I can follow my own advice!)
The base of this poster is just a piece of regular copy paper or cardstock. The folded flaps are regular copy paper cut into 2 ½ inch x 4 inch pieces. (Okay, I discovered that trick after making my model. My model only has a ½ inch flap to glue to the poster, but this made coloring it a trick. My students, instead, create a folded piece, with the info written inside that they glue down; this is much simpler that writing on the poster itself.) Each of the flap pieces, 9 in total, need the flower parts labeled on their fronts. For younger kids you could simplify this by omitting the parts they don’t yet need to learn.
Again, we fill out the information as a class to ensure students have correct and complete information to study, and once the poster is ready, students can use it to study and self-test.
Plant Parts And Their Jobs; A Science Foldable
As you are going to discover, I adore foldables. Many of my postings will show the foldables I use in my classroom.
Here is my model for plant parts. To create it, a regular sheet of copy paper (or in the case of my model, cardstock) is folded in half, hotdog (or lengthwise) style. Cut marks are made every 2 3/4 inches, but don't cut it yet, as it will make drawing the flower more difficult. Using these marks, draw a flower in the top section, making it large enough to fill the space. In the next section down, you will need to draw a leaf or two and a bud. The following section is the easiest--just continue the stem and establish the ground line. In the bottom section, draw roots. For my example, I drew fibrous roots because these are the roots my students most easily recognize. Color your image and label the parts. Now, you are ready to cut the sections apart.
Inside, using the cuts as a guide, my students and I fill out the information needed for each plant part, in particular the job of the part. We fill all this out together to ensure students have complete and accurate information.
Once the foldable is ready, students use them to study from and to self test.
Tip: reluctant artists may find free hand drawing a flower intimidating. While I encourage them to try to do it on their own, I do have traceable images they can use if the stress of drawing is too great.
Subscribe to:
Posts (Atom)