This blog is just my little space for sharing lessons I've developed for my classroom and ideas that inspire my teaching.
Tuesday, December 20, 2011
Polar Express Ticket Share
My class is book buddies with a kinder class. The kinder class enjoys a whole unit with The Polar Express, and since it happens to be one of my favorite picture books too, I've figured out ways to make it work for my 4th graders. Although it changes every year (often based on how long it took us to finish The Best Christmas Pageant Ever), I love using The Polar Express as a prompt for working with figurative language, persuasive letter writing, and sequencing. I also adore bringing the story to life and working it into other subjects, such as math.
The ticket you see in the photo is given to my students at the beginning of our fun. I print them on gold vellum paper (from Hobby Lobby or Michael’s). After cutting them apart, I use a circle punch to notch the ends so it will look like a ticket. Because vellum doesn’t absorb the ink, unless you are using a laser printer, I suggest having the tickets laminated. Otherwise, the students’ fingers will smudge the printing. I feel it is worth the effort, as the gold vellum has a sheen and translucence that the kids see as special—far more so than regular paper printed with a golden yellow ink. I’ve shared the link for my tickets below. The ticket number is actually the date on which the ticket was given, helping to make it a keepsake.
http://www.4shared.com/file/_dAA2ZFU/polar_express_ticket.html
The link below is a division worksheet I created to try and bring a bit of fun into our math.
http://www.4shared.com/office/7LfKMlsQ/polar_express_division.html
I sure hope those links work. This is my first time trying to share files! Please let me know if they don’t work. :)
Student Gifts Wrapped Pinterest Style
I love pinterest! http://pinterest.com/celestenm/school/ is my school board, which I may soon need to split into subjects!
This wrapping, however, was pinned on my Christmas board. I loved the simplicity of using an edge punch on a paper lunch bag. I tested a snowflake punch first, but I found it was too fussy for the look I wanted. So, I went with Stampin Up's scallop edge punch instead, and I adore the result. I actually like the tartan ribbon the best, but I ran out, and because I am like instant gratification, I just used another ribbon I had at school. Next time, I would wait and bring more of the tartan instead. Still, I like how both ribbons turned out. Inside, is a book, which the students are supposed to read over the break, as our first assignment upon returning requires it. (I know; it was sneaky slipping learning in with a gift!)
Wednesday, November 2, 2011
Dead Words
This is one of my favorite lessons for October! To practice using a thesaurus and improving word choice in our writings, my class chooses words to bury. These ‘dead words’ are either over used words or weak words. First, my class brainstorms words that we use too often or that aren’t very strong at getting our thoughts across to the reader. I have a container that holds dead words written on slips of paper. The students reach in and pick a word. They have to think of how they use this word: is it a verb, an adjective, or an adverb. Then, they use the classroom thesauruses to look it up. I require 12 alternatives, and this makes the task more challenging, as most of the words do not have that many substitutions in our thesauruses. Thus, the students often get on the classroom computers to look up other synonyms, or they brainstorm with other students. Once they have their list, they create gravestones. Once the gravestones are ready, we hold a ceremony to say goodbye to the dead words and bury them. The posters, then, hang where everyone can read them (and help create a bit of a Halloween mood too, I might add), but most importantly, when we write the students will point out to each other (and me) when a dead word is used, even after the gravestones are removed.
Tuesday, November 1, 2011
Skeletal System
My class just finished learning about the skeletal system. We used http://www.eskeletons.org/pdf/000646791.pdf for the printable skeletons. I put the students in small groups and explained that bones have 3 possible jobs: provide structure, allow movement, or protect organs. In their groups, the students had to decide the job/s of the major bones. They then cut the skeletons out, assembled them on black butcher paper, labeled bones, and told the job/s they thought the bone did.
Monday, October 31, 2011
State Cookies
Thursday, October 20, 2011
State Brochure
We are working on the locations that make NM interesting and unique. After reading and researching points of interest, including state and national parks and monuments, the students had to choose a required number of each to write about. A script was provided for developing writers, but strong writers were encouraged to use stronger voice in their writings. No matter which writing style they chose, the same content was required: What is the place called? Where is it located in the state? What is one interesting fact about it? What is something you might learn about it or the state if you visit it?
The brochure was created using am 11” x 18” piece of construction paper that was accordion folded. The cover had to feature an image of NM and the state name. The 4 inside panels focused on specific types of parks , monuments, or events/attractions. The back panel showcased our state’s symbols.
Sunday, October 16, 2011
Saturday, October 15, 2011
Flower Parts You Can Eat!
Sorry the image is blurry! I'm also sorry I don't remember where I discovered this idea to give credit; it is a fantastic activity! After studying plant and flower parts, including the foldables I posted before, my students created flower parts they could eat once they labeled them all correctly. The petals are fruit rolls. The stamens are licorice pulls (a single strand). The sepal was a full-size licorice. The pollen was cake/cookie sprinkles. (Tip—put these in a small cup. Have a second cup with water next to it. Have the kids dip the licorice in the water and then in the sprinkles.) We keep the ovary and its breakdown simple at our grade level, but you could get more detailed if needed. A marshmallow and m&m were used.
Ecosystem Dioramas
After my students were put into small groups, they drew an ecosystem to study. Books, websites, and other materials were available for the students to use. They had prompts they had to answer, including:
~What are some plants that grow in your ecosystem? Describe some of their adaptations that allow them to thrive.
~What are some animals that live in your ecosystem? Describe some of their adaptations that allow them to thrive.
~Describe the climate, including average seasonal temperatures and precipitation.
The reports were hung over the diorama for others to read.
While the groups were working, I stopped at each to ask questions and prompt them too. The level of engagement was phenomenal.
Wednesday, October 12, 2011
No More "Said"
"Said" is one of those words I see too often in fourth-grade writings. While it isn't off limits totally, I have set a limit of once per paragraph. This poster, then, offers some other options from which students can draw.
"No Said" Printable
Tuesday, October 4, 2011
Cacti Adaptations Model
After reading Cactus Hotel, a wonderful book about the desert ecosystem, food chains in the desert, and cactus adaptations, my students created a model cactus to bring the adaptations to life. As the Styrofoam balls were being painted green, we talked about chlorophyll and its role in photosynthesis. We recalled why many desert plants either don't have leaves (like cacti) or have very small ones (to reduce water loss). The fleshy nature of cacti was also discussed as a water storage feature. Once the balls were dry, the spikes were added. Students were given lengths of floral wire to cut into short pieces. These were poked into the cactus at even distances around it. As they did this, students talked about the protection these provided, both from hungry/thirsty herbivores and subtle shade that is provided. Small, square tissue paper flowers were then added. (Use a pencil with an eraser to shape the tissue paper, dab in glue, and set.) While students did this, we talked about the role of flowers—to attract pollinators. Although we did not make the fruit that follows pollination, we discussed its purpose too—to attract animals that will eat it and spread the seeds to continue the survival of the species. My students were extremely proud of their creations and did exceptionally well on the assessment for cactus (and other plants) adaptations.
Monday, September 12, 2011
Kindness Lesson
I provide my students with the outline and instruct them to create it in their likeness--wearing the same clothing, same hair, same eyes, etc. I let them know these will be one of the first pieces of their work to hang in our hallway, and I give them enough time to work on them for them to understand these are important and real work--not just a chance to color. When they are done, and the figures are cut out, we gather in a circle. I explain to them that when they begin the school year, they are a lot like the figures they've created--the best they can be. We then pass the figures 2 people to the right, and I ask the whole class to look at the image and tell it that it is stupid. As they do this, they crumple the figure. We pass it to the right again, tell it "I don't like you," and crumple it again. After 3-4 passes, it is returned to its owner, and I ask if it looks how it did when we started. Of course, the answer is no. Now, it is usually a little, crumpled ball. I ask them how they feel about what has happened to their hard work and let several students share.
We now pass it around again, the exact way we passed it before. At each stop, we apologize and flatten the figures out as gently and thoroughly as we are able. It is returned to its owner again, and I ask if it looks better than it did the last time it was returned. Yes, it does, but I also ask if it looks like it did when we started. No, it doesn’t. There are wrinkles and little rips in it that our attempts to fix just couldn’t do. I explain that when they start the school year, they are like the images—fresh and as perfect as possible. As we interact with one another, and negative things are said or done to us, it is like the paper being crumpled. We can apologize and try to make things right, but the damage is done and can never be totally undone. We can make it better, but the scars remain.
This is a powerful lesson. The kids are invested in their artwork and feel the shock and pain of watching it ruined, and for most, seeing the images is a reminder of how important their words and actions are to others.
Tuesday, August 2, 2011
Photosynthesis Model
After learning the photosynthesis song, http://www.youtube.com/watch?v=C1_uez5WX1o, we create a photosynthesis model. This model begins as a single sheet of copy paper. Fold it in half and cut out a large leaf shape. Very little scrap should be left over, but don’t toss it away! The two leaves are glued together from the petiole towards the tip. We draw in veins and label the upper epidermis. Fold the upper leaf back, so it stands up and away from the lower leaf. Draw the veins on the lower leaf. I show the students how to draw a cross-section that indicates the epidermis layer. Using some of the scraps, we cut and color a scalloped strip to represent the chloroplasts. This gets glued to the upper leaf, along the inside, right at the fold. Finally, students cut out 4 arrows, free-hand or stenciled, label each with the basic steps of photosynthesis, and glue them to the leaf.
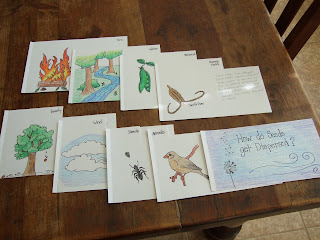
How Do Seeds Get Dispersed?
First, I should give a “heads-up.” This is not a one-class period lesson. There is going to be a lot of drawing, discussion, and writing. Plan on at least 2-3 class periods for students to complete this mini-book.
Here, students will create a book where each page presents a different way in which seeds get moved from one location to another. Yes, my class uses the term “dispersal.” It is an advanced word for them, but in my experience, they assess more importance to academic language than the common words they use. So using the term ‘dispersal’ instead of saying ‘moved around’ creates for them a greater sense of importance to the process.
You will need 5 sheets of paper to build this book. Cut the papers in half width-wise. Along the top edge of the half sheets, measure in 1 inch x 1 inch and remove (cut) that square inch off. On the next page, remove a 2 inch x 1 inch section. On the third page remove a 3 inch x 1 inch section. Continue increasing the size of the section this way until your cover page, where you will remove the entire top down 1 inch. (Refer to the photos to see how this looks when done.) Assemble book by punching three holes along the left-hand side and using brads. Create a cover page with the title “How do Seeds get Dispersed?” Label each tab with a type of seed dispersal. On the page of each tab, draw an example and explain how that form of dispersal works. My class often gets into deep discussion about each method, and in the case of the barbs, hooks, and burrs, I bring in examples for the students to examine.
Once ready, students can use the booklet to study and self-test.
Cross-Pollination & Self-Pollination
This is another super simple foldable, called a shutter fold. It begins with a regular sheet of copy paper. Each ‘short’ side is folded in towards the center of the paper. On the front, each flap contains an example of one type of pollination and is labeled. Be sure your students understand that one flowering plant is growing from a single root system while the other shows two flowers with separate root systems.
Inside, there is plenty of room for explaining each type of pollination and comparing/contrasting their similarities and differences. We usually cover the pros and cons of each type of pollination too.
Types of Roots: A Science Foldable
This foldable is so simple! Fold a regular sheet of copy paper in half hamburger (width-wise) style. Cut the front in half up to the fold line. On one side, draw a fibrous root and on the other a tap root. As a class, we discuss the physical differences while we are drawing them.
Once we are ready to write our information inside, we brainstorm reasons for the differences, benefits and drawbacks of the differences, and examples we’ve come across. I make sure that the students know that fibrous roots are great for erosion control, are able to get shallower water sources, and firmly hold a plant (think of all those weeds you’ve tried to pull!). Meanwhile, a taproot makes it difficult to destroy a plant because even the smallest root bit left behind will begin to regrow. We also look at young seedlings and how many start with a taproot but will develop fibrous roots as it matures.
Limb, Branch, And Twig; A Science Foldable
The queen of foldables, Dinah Zike, suggested this foldable in her Big Book of Science. I hand drew the image based on her example. Just like the flower parts foldable, the cut marks were made at 2 ¾ inches. Each section contains part of the tree and is labeled to identify it. Here, unlike the Parts of a Tree Poster, we are able to clearly see the difference between a limb, branch, and twig.
Under each flap, is a description of the part’s job. We do this part as a class to ensure all students have complete and correct information. Then, like with other foldables, students are able to study and self-test themselves.
Parts Of A Tree; A Science Poster
I am always amazed what I learned but was never officially taught. Then, my students come to me, and I sometimes expect them to have the same background information. I am constantly reminding myself that I cannot make such assumptions. The parts of a tree exemplify this. While many students know what a trunk is, they may not know the difference between a limb and a branch or that the top of a tree is called a “crown.”
This is a poster drawn on a regular sheet of copy paper. I have the students freehand a tree while I walk them through it by drawing on the board. Believe it or not, I start with the foliage. Basically, they are cloud-like shapes, but I only do these on one side of the paper. Then, we draw the trunk and roots. At this point, the hardest part begins—limbs, branches, and twigs. I remind my students that most of these will reach upwards (and we discuss why—to help the leaves get as much sunlight as possible). They also become narrower the further they are from the trunk. You will also notice that my model displays one of my favorite art lessons—nothing in nature is a single color! I don’t let my students get away with solid, green foliage. (We don’t have art in our school, but I am an artist; I try to get art lessons in whenever I can!) We talk about where the sunlight is going to hit the leaves the most and color that area a lighter green than where there will be shadows, which will be the darkest green.
This is a quick lesson to ensure that we all have the same background knowledge and can use the same vocabulary.
Flower Parts And Their Jobs: A Science Poster
First, I need to admit that I traced this image. I didn’t like any of my free-handed, dissected flowers, and just like I tell my students not to get hung up on their drawings, I had to allow that the stress of drawing this image well enough was getting too great. (I’ll also admit that I am rather proud I can follow my own advice!)
The base of this poster is just a piece of regular copy paper or cardstock. The folded flaps are regular copy paper cut into 2 ½ inch x 4 inch pieces. (Okay, I discovered that trick after making my model. My model only has a ½ inch flap to glue to the poster, but this made coloring it a trick. My students, instead, create a folded piece, with the info written inside that they glue down; this is much simpler that writing on the poster itself.) Each of the flap pieces, 9 in total, need the flower parts labeled on their fronts. For younger kids you could simplify this by omitting the parts they don’t yet need to learn.
Again, we fill out the information as a class to ensure students have correct and complete information to study, and once the poster is ready, students can use it to study and self-test.
Plant Parts And Their Jobs; A Science Foldable
As you are going to discover, I adore foldables. Many of my postings will show the foldables I use in my classroom.
Here is my model for plant parts. To create it, a regular sheet of copy paper (or in the case of my model, cardstock) is folded in half, hotdog (or lengthwise) style. Cut marks are made every 2 3/4 inches, but don't cut it yet, as it will make drawing the flower more difficult. Using these marks, draw a flower in the top section, making it large enough to fill the space. In the next section down, you will need to draw a leaf or two and a bud. The following section is the easiest--just continue the stem and establish the ground line. In the bottom section, draw roots. For my example, I drew fibrous roots because these are the roots my students most easily recognize. Color your image and label the parts. Now, you are ready to cut the sections apart.
Inside, using the cuts as a guide, my students and I fill out the information needed for each plant part, in particular the job of the part. We fill all this out together to ensure students have complete and accurate information.
Once the foldable is ready, students use them to study from and to self test.
Tip: reluctant artists may find free hand drawing a flower intimidating. While I encourage them to try to do it on their own, I do have traceable images they can use if the stress of drawing is too great.
Subscribe to:
Posts (Atom)